Are you tired of cluttered spaces? Building a storage shed is a great way to add extra space. But first, you need a solid foundation – the shed floor. This easy DIY guide will show you how to build a strong shed foundation for your storage shed.

When building a shed floor, you have many options. Pressure-treated plywood is a top choice because it’s durable and resists water and rot. It’s also more affordable than other options. If you’re on a tight budget, OSB (oriented strand board) is the cheapest. But it might not be the best for areas with a lot of moisture.
Before starting your shed floor, plan and gather all needed tools and materials. You’ll need lumber for the floor frame, like pressure-treated 4x4s, 2x6s, and 2x10s. Also, get flooring materials like plywood or OSB. Don’t forget fasteners, like galvanized nails and structural screws, for a strong floor.
Key Takeaways:
- Building your own storage shed can be more cost-effective than purchasing a pre-made shed kit.
- Pressure-treated plywood is a durable and water-resistant flooring option for your shed.
- Proper planning and gathering of materials are key for a successful shed floor project.
- A solid shed foundation is essential for the longevity and stability of your storage shed.
- Consider factors such as size, materials, and location when planning your shed floor construction.

Understanding Shed Floor Basics
Building a shed starts with a strong foundation. A good shed floor keeps your stuff safe from moisture, pests, and damage. Let’s look at why a solid floor is key and what materials you can use.
Importance of a Sturdy Shed Floor
A solid shed floor is vital for many reasons:
- It stops warping and sagging, keeping your shed strong.
- A level floor keeps your items stable and organized.
- It also keeps moisture and pests away, protecting your things.
Building a strong shed floor is worth the effort. It makes your shed last longer and keeps your items safe.

Common Shed Floor Materials
There are many materials for your shed floor:
| Material | Pros | Cons |
|---|---|---|
| Pressure-treated lumber | Durable, resistant to moisture and insects | More expensive than other options |
| Pressure-treated plywood | Relatively inexpensive, durable | May require additional moisture barriers |
| OSB (Oriented Strand Board) | Cheapest option | Less water-resistant, prone to swelling |
| Concrete | Most durable, low maintenance | Expensive, requires more prep work |
The right material depends on your budget, shed type, and local climate. Pick one that meets your shed’s needs for strength and durability.
Knowing about shed floors and picking the right materials helps build a strong base for your shed. It will last for years.
Planning Your Shed Floor
Before you start building your shed floor, it’s important to plan well. You need to know what you’re doing and have all the right stuff. Good planning saves you time, money, and headaches later on.
Determining the Size and Layout
The size and layout of your shed floor depend on what you’ll use it for. Think about what you’ll store and how much space you need. This helps with access and keeping things organized.
Shed sizes vary. Here are some common ones:
- 8×8 feet
- 8×10 feet
- 8×12 feet
- 10×12 feet
- 10×16 feet
For example, an 8×12 feet shed needs a specific floor frame. Place floor joists every 16 inches across the 8-foot width.
Checking Local Building Codes
Before you start, check your local building rules. These rules can change where you live and affect your shed’s size, height, and placement. Some places need a building permit for bigger sheds, while others have rules for anchoring the shed.
Always talk to your local building department to follow the rules and get any needed permits before you start.
Gathering Necessary Tools and Materials
Having the right tools and materials makes building your shed floor easier. Here’s what you’ll need:
| Tools | Materials |
|---|---|
| Miter saw | Treated lumber (2×6) |
| Circular saw | 3/4″ plywood (subfloor) |
| Tape measure | 3″ exterior screws |
| Pencil | 1.5″ exterior screws |
| Clamps | Liquid nails for subfloor |
| Chalk line | |
| Drill | |
| Safety glasses | |
| Face mask | |
| Ear protection |
Choose lumber based on what you’ll store. For lighter items, 2×6 treated lumber works. For heavier stuff, use 2×8 treated lumber. For the subfloor, go with 3/4″ pressure-treated or exterior-grade plywood for durability and to keep moisture out.
Preparing the Foundation
Before you start building your storage shed floor, make sure the foundation is ready. A solid foundation is key for a stable and lasting shed. Let’s look at the important steps for site preparation and foundation options for your DIY shed project.
Leveling the Ground
The first step is to level the ground where your shed will go. Remove grass, rocks, and debris first. Use a shovel or rake to make the surface even. This prevents your shed from settling or shifting over time.
- On-grade foundations are quick and easy, good for most small to medium sheds.
- Frost-proof foundations are stronger and last longer, great for larger sheds or frosty areas.
- Skid foundations use long timbers like 4x6s and 8x8s, best for flat sites.
- Timber-frame foundations accept various flooring and use 4x4s, 4x6s, or 6x6s.
Installing Deck Blocks or Concrete Piers
After leveling, you can install deck blocks or concrete piers. Deck blocks are simple and affordable for smaller sheds. Place them about every 4 to 6 feet for a stable base.
For a more lasting foundation, use concrete piers. Dig holes at each corner, fill with concrete, and wait for it to cure. Then, attach brackets inside the frame and secure them to the foundation with anchors.
| Foundation Type | Suitable Shed Size | Key Considerations |
|---|---|---|
| Concrete Paver | Under 160 sq ft | Easy to install, budget-friendly |
| Treated Wood Frame with Gravel | Small to medium | Good drainage, cost-effective, suitable for flat ground and small slopes |
| Treated Wood Frame on Concrete Blocks | Small to medium | Versatile, easy to DIY, accommodates slopes up to 6 degrees |
| Treated Wood Frame on Concrete Piers | Any size | Stable, universal foundation for any soil or slope, requires digging based on freeze line |
For sheds over 200 sq. ft. or taller than 12 ft., frost-proof foundations might be needed. Always check local building codes before starting your shed floor project.
Constructing the Floor Frame
Building a strong floor frame is key for a durable storage shed. Start by cutting lumber to fit your shed’s size. Use pairs of pressure-treated 4x4s for each side of the frame.
Then, put together the outer frame joists. Use 3″ 16d framing nails to join them at the top, middle, and bottom. The floor joists sit on top of the 4x4s without needing extra support. Use 2×6 and 2×10 lumber for the floorboards, secured with epoxy-coated screws.
To check if your floor frame is square, measure diagonally. The measurements should be close, within 1/8 inch. If not, adjust by hammering or moving deck blocks. This ensures your shed base is level and stable.
| Material | Purpose | Fasteners |
|---|---|---|
| Pressure-treated 4x4s | Floor frame foundation | 3″ 16d framing nails |
| 2×6 and 2×10 framing lumber | Floorboards | Epoxy-coated decking screws |
| Structural screws | Assembling half-lap joints | N/A |
When cutting notches in the 4x4s, set the saw blade depth to half the lumber’s thickness. Make sure the shed floor is at least 2 inches off the ground. This prevents rot and keeps rodents out.
Framing should be checked constantly to ensure it stays straight by using string and small blocks of plywood.
By following these steps and focusing on detail, you’ll build a strong floor frame for your storage shed.
Installing Floor Joists
Building a sturdy storage shed floor starts with installing floor joists correctly. These joists support your shed floor, making it strong enough for your items. A 10×12 shed can hold up to 2,400 lbs, thanks to its floor.
To start, cut the rim joists to fit inside the floor frame. Place them 12″-16″ apart for the best support. Mark the frame to show where each joist will go, ensuring even spacing.
Positioning and Spacing Floor Joists
Use Simpson screws to attach joist hangers, making sure they’re flush with the frame. Place the joists in the hangers and tap them down if needed. Secure the hangers with 3″ nails at an angle. This step is critical for a level and stable floor.
Attaching Joist Hangers
Joist hangers are key for securing joists to rim joists. They help spread the weight evenly. Always use the right screws and follow the manufacturer’s guide when attaching hangers.
Adding Blocking for Extra Support
For extra support, cut 2×6 blocks and place them at 4′ and 8′ from the frame’s edges. This blocking helps keep the joists stable and prevents sagging.
Remember, proper joist installation is vital for a durable shed floor. By following these steps, you’ll build a strong foundation for your shed.
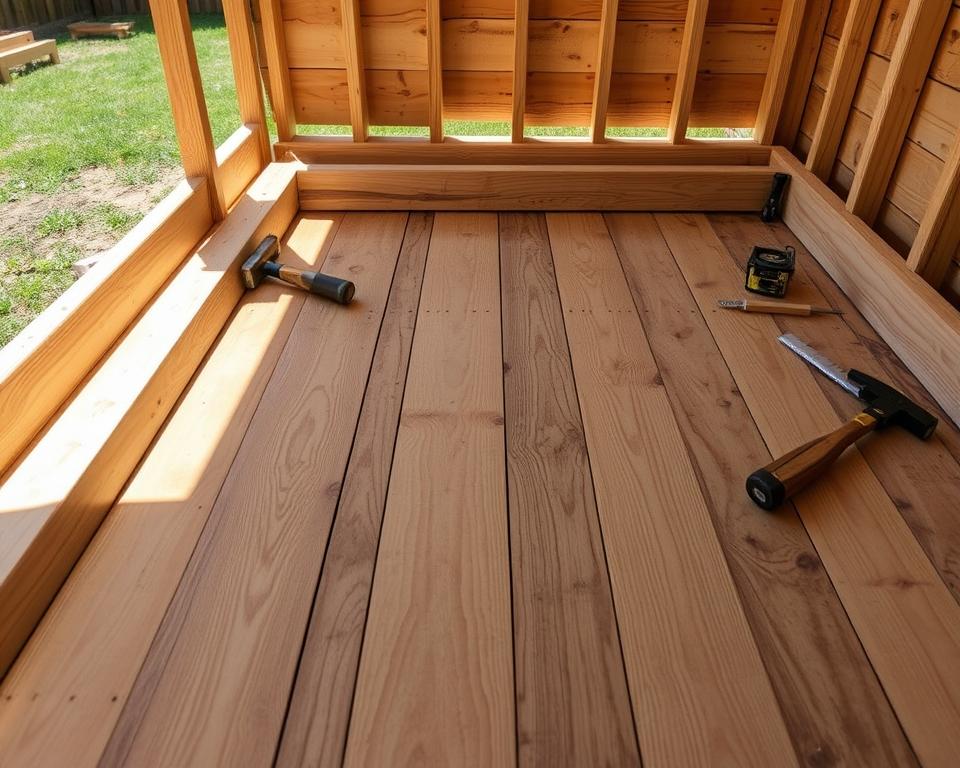
Laying the Subfloor
Now that the shed floor frame is ready, it’s time to put in the subfloor. A good subfloor is key for a sturdy shed floor. It can handle the weight of your stuff well.
A storage shed floor can hold up to 20lbs per square foot. So, a 10×12 shed can support about 2,400lbs.
Cutting and Fitting Plywood Sheets
Plywood is a top choice for shed subfloors. It looks better than concrete and oriented strand board (OSB), and it’s not too pricey. Start by cutting the plywood sheets to fit your frame with a circular saw.
Here are some common shed sizes and their prices:
| Shed Size | Base Price Range |
|---|---|
| Small (up to 80 sq. ft.) | $4,163 – $5,507 |
| Medium (81-120 sq. ft.) | $4,965 – $8,257 |
| Large (121-200 sq. ft.) | $6,223 – $15,071 |
| Extra Large (201+ sq. ft.) | $9,864 – $29,934 |
Make sure the plywood fits well by measuring twice and cutting once. For a clean look, use a straightedge or chalk line for your cuts.

Securing the Subfloor to the Joists
After cutting the plywood to size, secure it to the joists. Place the sheets with the smooth side up. Use a nail gun or screws every 8 inches along the joists. This keeps the subfloor stable and quiet.
Remember to use pressure-treated plywood for your subfloor. It resists moisture, rot, and insects.
For extra stability, apply subfloor adhesive to the joists before laying down the plywood. This helps prevent any movement over time. With the subfloor in place, your shed floor is ready for the next steps.
Anchoring the Shed Floor
It’s key to anchor your shed floor right to keep it stable and safe. Anchoring stops the shed from moving in strong winds or other forces. It also spreads the shed’s weight evenly on the foundation.
- Using cable tie-downs anchored to the ground
- Fastening the floor to concrete posts sunk into the ground at a pre-determined depth
Choosing between these methods depends on weather and shed size. Always follow local building codes for the right anchoring method.
Cable Tie-Down Method
For cable tie-downs, use four anchors in each corner of the shed floor. This meets building codes across the country. Add blocking between anchors for extra support, using treated 2×4’s or concrete blocks. Space blocking every 3-4 feet along the skids.
Concrete Post Method
The concrete post method involves digging holes, setting posts in concrete, and attaching the shed floor to them. It’s good for uneven or sloping ground. You might need blocking, concrete anchors, and support beams. Skids and support anchors should be 3 feet apart for best stability.
| Anchor Type | Pullout Resistance | Suitable Foundation |
|---|---|---|
| Concrete Piers | 350 to 14,000 lbs | Gravel |
| Arrowhead Anchors | 1,700+ lbs | Gravel |
| Bullet Anchors | 350 to 2,000 lbs | Sand, Hardpan, Asphalt |
For concrete piers, aim for a diameter of 12″ to 24″. Place at least one pier every 8-10 feet. Piers should be 12″ below the frost line, with depths from 24″ to 48″ based on your location.
A general rule for shed foundation piers is to have at least one pier every 8-10 feet along the width and length of the shed.
By anchoring your shed floor with cable tie-downs or concrete posts, it will stay stable and secure for many years.
how to build a storage shed floor
Building a storage shed floor is key to a durable and useful outdoor area. With the right tools, materials, and methods, you can make a strong base for your shed. This DIY shed floor guide will guide you through the process. It offers tips and a detailed tutorial on building a storage shed floor.

Step-by-Step Guide for Building a Storage Shed Floor
First, make sure you have all the tools and materials you need. Also, check local building codes for any special rules. Here are the steps to build your shed floor:
- Prepare the site by leveling the ground and installing deck blocks or concrete piers.
- Mark and cut the rim joists and floor joists to the right lengths.
- Assemble the outer frame by attaching the rim joists to the deck blocks or piers.
- Install the floor joists using joist hangers, ensuring they are spaced evenly (typically 16 inches apart).
- Add blocking between the joists for extra support and stability.
- Lay the subfloor by cutting and fitting plywood sheets, then secure them to the joists.
- Anchor the shed floor to the foundation using appropriate methods, such as anchor bolts or straps.
| Foundation Type | Suitable Shed Size | Pros | Cons |
|---|---|---|---|
| On-grade | Up to 160 sq ft | Simple, cost-effective | Not suitable for larger sheds |
| Concrete pavers | Under 160 sq ft | Easy installation | May shift over time |
| Treated wood frame with gravel | Versatile | Good drainage | Can shift on wet/soft soil |
| Wood frame on concrete blocks | Flat ground, slopes up to 6° | Flexible | May sink due to vibrations |
| Wood frame on concrete pier/deck blocks | Level ground | Lifts shed away from water | May sink over time |
| Wood frame on concrete piers | Any size, soil, or slope | Permanent, stable | Requires more work |
Tips and Tricks for a Successful DIY Shed Floor Project
To make your shed floor project a success, remember these tips:
- Always double-check your measurements to avoid costly mistakes.
- Use a chalk line to mark joist locations for accurate placement.
- Seal cut ends of lumber with wood preservative to prevent moisture damage.
- Consider insulating your shed floor for added comfort and energy efficiency.
- Choose the right flooring material based on your needs, budget, and desired aesthetic.
A well-built shed floor is the foundation for a functional and long-lasting outdoor storage space.
By following this guide and using these tips, you can build a strong and reliable storage shed floor. It will last for many years.
Finishing Touches
Now that your storage shed floor is built and in place, it’s time to add the final touches. These steps will protect it from the weather and keep it lasting longer. It’s important to finish the floor right, protect it from moisture, and choose the right insulation.
Sealing and Protecting the Shed Floor
To keep your 3/4-inch tongue-and-groove ACX plywood floor dry, seal it with a water-based polyurethane. Use a paint roller to spread it evenly. This will help keep water out and make your floor last longer.
Adding Insulation and Moisture Barriers
Sealing the floor is just the start. Adding insulation and moisture barriers under the subfloor will also help. You can use:
- Rigid foam boards
- Rolled insulation
For moisture barriers, you have options like:
- Plastic sheeting
- Specialized membrane products
These layers will keep your shed’s temperature stable and stop moisture from rising. They protect your stuff and the shed itself.
Remember, spending time and effort on your shed floor’s finish and protection will save you in the long run. It will keep your storage space dry, comfy, and useful for many years.
Conclusion
Congratulations on learning how to build a strong storage shed foundation! This DIY guide has given you the skills and confidence for your project. A solid shed floor is key for your storage space’s long life and use.
When planning your shed floor, think about its size, layout, and local building rules. You’ll need tools and materials like pressure-treated plywood or concrete. These can hold about 20 lbs per square foot. It’s important to prepare the foundation, build the floor frame, install joists, lay the subfloor, and anchor the floor for a durable shed floor.
For the best outcome, take your time and focus on the details. Seal and protect the shed floor from moisture and rot. Adding insulation and moisture barriers can also improve comfort and protection. With a well-made DIY shed floor, you’ll have a reliable storage space for years.
Now that your shed is built, you can feel proud of your work. You have a functional and attractive storage solution you made yourself. Happy organizing and storing!