Are you fed up with a weak or old shed door? It’s time to make a change. Learn how to build a strong, stylish storage shed door. Our DIY guide will show you how to make a door that’s not just good-looking but also keeps your tools safe.

Start this DIY project and make your storage shed better with a custom door. Our guide will walk you through every step. You’ll learn how to pick the right materials and install the door perfectly. This guide is for everyone, whether you’re experienced or new to DIY projects.
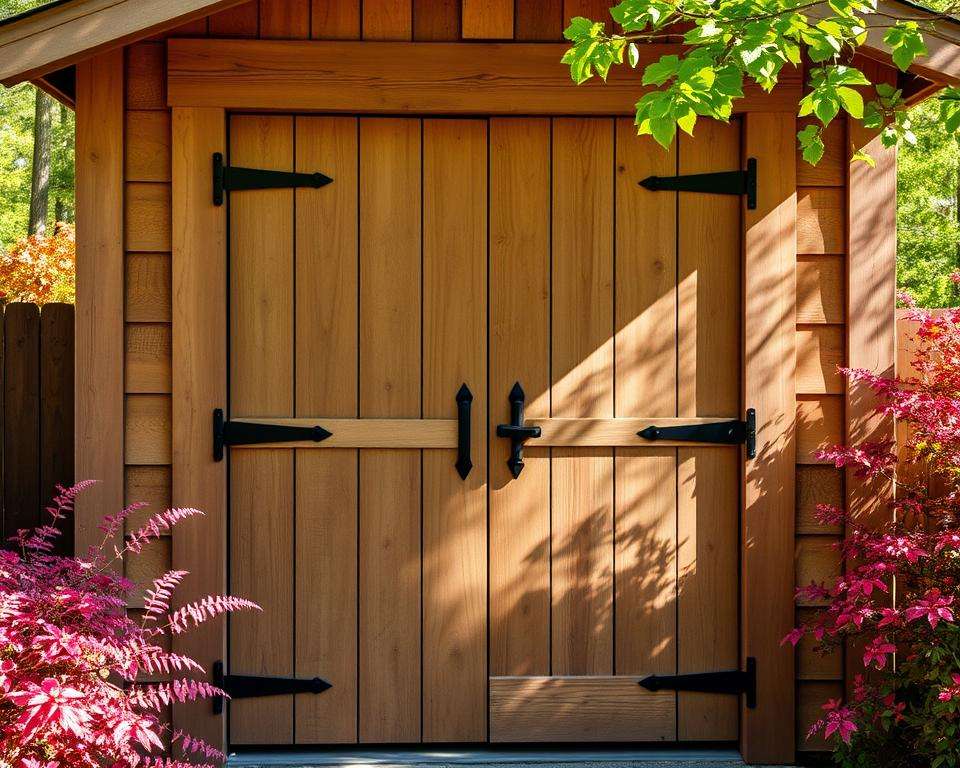
Make your outdoor space better with a wooden shed door. Our tips and quality materials will make your shed look great and last long. Say goodbye to bad doors and hello to a door that makes you proud.

Key Takeaways
- Learn how to measure and size your shed door accurately for a perfect fit
- Discover the best materials for building a durable and weather-resistant shed door
- Master the techniques for assembling and installing your DIY shed door
- Enhance your shed’s security and functionality with a well-designed door
- Transform your outdoor storage space with a custom-built shed door that reflects your style
Planning Your Shed Door Build
Before starting your shed door project, it’s key to plan well. Measure accurately, pick the right materials, and think about your door style. This will help you make a strong and safe entrance to your storage area.
Measuring and Sizing Your Shed Door
To figure out your shed door size, measure the opening’s height and width. Subtract half an inch for clearance. Single doors should be up to 36″ wide. For wider openings, you’ll need double doors.
Think about the door’s thickness and any trim you’ll add. For a 7′ high shed wall, use a 2×6 header above the door.
Choosing the Right Materials
Pick the right wood type for durability, decay resistance, and your budget. Here are some good options:
- Cedar: Natural resistance to rot, decay, and insects
- Pine: Budget-friendly, works well in dry climates or with protection
- Redwood: Great against moisture and decay, less warping
- Oak: Strong, good for heavy use, fights off fungi and insects
- Treated plywood: Affordable, works well with seal or paint
- Composite materials: Easy to maintain, resists rotting and splitting
For door styles, consider T1-11 or LP SmartSide siding panels. Use exterior-grade hardware like galvanized or stainless steel for durability. A strong latch is vital for security.
Gathering Your Supplies and Tools
Before starting your DIY shed door project, make sure you have all the needed supplies and tools. This will help you build smoothly and avoid any delays.
Essential Tools for Building a Shed Door
You’ll need various tools for measuring, cutting, and putting together your shed door. Some key tools include:
- Circular saw or table saw for precise cuts
- Power drill and impact driver kit for drilling holes and driving screws
- Tape measure and carpentry pencils for accurate measurements
- Speed square and clamps for ensuring proper angles and secure holds
- Hammer for driving nails and general assembly
Having these tools ready will make your diy shed doors project easier and faster.
Materials Needed for Your DIY Shed Door
Choose durable, weather-resistant materials for your shed door. For a 6-foot tall by 6-foot wide double shed door, you’ll need:
| Material | Quantity |
|---|---|
| LP Smart Side panels | 2 |
| 1×4 LP Trim (3.5 inches wide) | As needed |
| 2x3x8 boards | 9 |
| 1.5-inch screws | 1 box |
| Shed door hardware (hinges, latches, braces) | As needed |
| Exterior paint | 1 quart |
| Nails | As needed |
Remember to pick shed door hardware like heavy-duty hinges and snap latches. This ensures your door works well and is secure.
Choosing and gathering your materials and tools carefully is key to a successful DIY shed door project.
Removing Old Shed Doors
Replacing a shed door starts with removing the old one carefully. Make sure not to damage the frame. Check how the door is attached to the frame. If the door is big or heavy, get help to avoid accidents.
Start by taking off any screws, nails, or bolts holding the door. Use the right tools, like a screwdriver or hammer, to do this. After removing all hardware, lift the door off the frame carefully.
Now, clean the frame of old paint, rust, or dirt. This makes the new door fit better. If the frame is damaged, fix it now. A sturdy frame is key for the new door to work well and last long.
| Door Material | Advantages |
|---|---|
| Cedar | Naturally resistant to rot, decay, and insect attacks |
| Pine | Budget-friendly and soft, ideal for dry climates or with a protective finish |
| Redwood | Excellent resistance to moisture, decay, and warping |
| Oak | Strong and resistant to fungal and insect problems |
| Treated Plywood | Economical and serves well when painted or sealed properly |
| Composite | Maintenance-free alternative to wood, resisting rotting and splitting |
Choose heavy-duty hinges for your new door. You’ll need two or three hinges, depending on the door’s size and weight. Add a lock for security. You can also stain the wood or use weatherstripping for extra protection and looks.
Preparing the Door Frame
Before you install your new shed door, make sure the door frame is ready. It needs to be solid, level, and square. This ensures your door opens and closes smoothly.

Inspecting and Repairing the Existing Frame
Start by checking the door frame for damage, rot, or wear. Look closely at the bottom, as it’s prone to moisture damage. If wood is damaged, replace it with new treated lumber.
For repairs, follow these tips:
- Remove nails or hardware with a heavy-duty metal cutting disc on a grinder.
- Use cement footings to prevent wood from touching the ground when rebuilding.
- Join framing parts with toenailing or pocket holes for strength.
Ensuring a Level and Square Frame
After fixing the frame, check if it’s level and square. Use a level on the top and sides. Make adjustments as needed and use shims if necessary.
To see if the frame is square, measure diagonally. If the measurements are the same, it’s square. If not, adjust it until they match. A magnetic angle locator helps with accurate measurements.
Lastly, sand the frame and apply wood preservative or primer. This protects the wood from the elements and extends the frame’s life.
| Door Type | Characteristics |
|---|---|
| Ledged | Tends to drop over time due to timber expansion and contraction |
| Ledged and Braced | Offers a balance of stability and ease of construction |
| Framed, Ledged and Braced | Strongest and most stable, preventing dropping and warping, but more complex to construct |
Proper preparation of your shed door frame ensures a perfect fit and smooth operation for years.
Cutting and Assembling the Door Frame
Building a strong shed door frame is key for your shed’s life and use. You need to focus on exact measurements and cutting skills. Also, putting the frame parts together right is important.
Precise Measurements and Cutting Techniques
Start by measuring the door opening’s height and width at different spots for accuracy. Use a sharp blade, miter saw, or circular saw with a guide for clean cuts. Woods like cedar, redwood, or oak are good because they resist rot and bugs.
When cutting, keep the wood steady and wear safety gear. Double-check your measurements and mark cut lines clearly to avoid mistakes.
Assembling the Frame Components
After cutting the frame parts, it’s time to put them together. Use wood glue and screws or corner brackets for this. Make sure the spacing is even and the structure is strong.
- Leave about a half-inch gap on all sides of the door opening for smooth operation during weather changes.
- Use a combination of wood glue and screws to assemble the 2x4s, creating a strong door frame.
- Add bracing at a 45-degree angle for increased stability and longevity.
- Space screws evenly, typically every 6 to 8 inches along the joints, to maintain structural integrity.
When picking materials for your shed door frame, think about these options and their features:
| Material | Characteristics |
|---|---|
| Cedar | Naturally resistant to rot, decay, and insect attacks |
| Redwood | Excellent resistance to moisture and decay |
| Oak | Known for its strength and resistance to fungal and insect problems |
| Treated Plywood | Economical option, when painted or sealed properly |
| Composite Materials | Maintenance-free alternative that resists rotting and splitting |
By using precise measurements and cutting, and assembling the frame well, you’ll make a solid shed door. It will last a long time.
Attaching the Siding to Your Shed Door
Now that your shed door frame is ready, it’s time to add siding. This will make your door strong and look good. When picking siding, think about how well it holds up to weather, how easy it is to put on, and how it looks.
Two top picks for siding are lap siding and plywood. Each has its own benefits.
Installing Lap Siding on Your Door
Lap siding, like LP Smartside panels, gives your door a classic look. Start at the bottom of the frame and work up, making sure each piece overlaps. Use 1″ galvanized staples or #8 common galvanized nails to secure it.
For a 6-foot tall and 6-foot wide double shed door, you’ll need two 4’x8′ panels of LP Smartside.
Using Plywood for a Solid Door Surface
Plywood is a great choice for a smooth, solid door surface. Measure and cut the panels to fit your frame, leaving a quarter-inch extra for easy opening and closing. Use construction adhesive and screws every 6-8 inches to attach it.
Treated plywood is a cost-effective option that resists rot when painted or sealed.
It’s a good idea to put a breathable barrier between the frame and siding to stop moisture buildup. Also, seal the bottom edge and seams with exterior-grade sealant for extra protection.
| Wood Type | Characteristics | Recommended Use |
|---|---|---|
| Cedar | Naturally resistant to rot, decay, and insects | Durable choice for various weather conditions |
| Pine | Budget-friendly and easy to work with | Suitable for dry climates or with protective finishes |
| Redwood | Excellent resistance to moisture and decay | Less prone to warping, ideal for shed doors |
| Oak | Strong and durable, resistant to fungal and insect problems | Withstands heavy use, suitable for shed doors |
How to Build a Storage Shed Door: Step-by-Step
Building a shed door is key to any storage shed. With the right tools and materials, you can make a strong and useful door. This guide will show you how to put together the door parts, add hinges and hardware, and hang your new door.
Assembling the Door Components
Start by laying out the door frame on a flat surface. For a 6-foot tall and 6-foot wide double shed door, you’ll need:
- 2 LP Smart Side panels
- 9 2x3x8 boards
- 3.5-inch LP Trim
Measure and attach the trim pieces from top to bottom of the LP Siding. Use nails every 4 to 6 inches. Then, join the corners with screws or brackets, making sure it fits well.
Installing Hinges and Hardware
Now, put the hinges and hardware on the door frame. Use heavy-duty hinges for their strength. Make sure they’re level and aligned. Use exterior-grade screws to avoid rust.
Next, attach the latch on the right door. Measure carefully for proper alignment. Add weatherstripping to seal gaps and prevent drafts.
Hanging Your Newly Built Shed Door
With the hinges and hardware on, hang your door. Use a friend or shims to hold it in place. Check that the door is level and aligned. Open and close it a few times to ensure it works smoothly.
| Material | Benefits |
|---|---|
| Cedar | Naturally resistant to rot, decay, and insect attacks |
| Pine | Budget-friendly; suitable for dry climates or when protected against rot |
| Redwood | Excellent resistance to moisture, decay, and warping |
| Oak | Strong and resistant to fungal and insect problems |
| Plywood | Economical when properly treated, painted, or sealed |
| Composite | Maintenance-free; resistant to rotting and splitting |
After installing your shed door, paint or stain it twice. This will protect the wood and make it look good. With these steps, your shed door will serve you well for many years, keeping your belongings safe.
Finishing Touches and Customization
After building your shed door, it’s time to add the final touches. These will make your door stand out. Here are some shed door customization ideas to consider:
Apply a protective finish like paint, stain, or wood preserver. This will enhance your door’s look and protect it from the weather. Choose a finish that matches your shed’s style.

To personalize your door, think about adding trim, window inserts, or unique hardware. These details can greatly improve your door’s look. For example, a decorative window insert lets in light and adds charm. Unique hardware, like vintage hinges, adds style.
When it comes to shed door customization ideas, you have many options. Here are some popular ones:
- Paint your door in a bold, contrasting color to make it a focal point
- Add a decorative wreath or hanging planter to the front of your door
- Install a unique door knocker or handle for a touch of whimsy
- Incorporate a chalkboard or whiteboard panel for practical and decorative purposes
- Use stencils or decals to create a personalized design or message on your door
Make sure to seal the edges of your shed door well. Use weatherstripping or caulk to keep drafts and moisture out. This will keep your shed comfortable and protect your items.
“A well-customized shed door not only adds to the overall appearance of your outdoor space but also reflects your personal style and creativity.”
| Customization Idea | Benefits |
|---|---|
| Protective finish (paint, stain, wood preserver) | Enhances appearance, improves durability |
| Decorative trim | Adds visual interest and character |
| Window inserts | Allows natural light, provides charm |
| Unique hardware | Adds style and personality |
| Proper sealing | Prevents drafts and moisture intrusion |
By adding these finishing touches, you’ll make your DIY shed door both functional and beautiful. It will perfectly match your outdoor space.
Conclusion
Congratulations on finishing your diy shed door project! You’ve built a strong and good-looking door. This door will make your storage shed more useful and attractive. You picked the right materials, measured carefully, and installed it securely.
You learned about different woods for shed doors like cedar, pine, redwood, and oak. Each wood has its own benefits. You also got to know the tools and hardware you need, like a tape measure, saw, and screws.
By making sure the door frame is level and square, you set up your door for success. Now, you can be proud of your custom shed door. It’s tailored to your needs, whether it’s a sliding door, double doors, or a standard hinged door.
Remember to keep your door in good shape by applying a quality sealant. Regular cleaning and checks will also help. Your diy shed door project is now complete. You can enjoy the satisfaction of a job well done and the convenience of a fully functional storage shed.
With this project done, you’ve gained valuable skills and knowledge. You’re ready to take on more DIY projects with confidence. Enjoy your upgraded shed and the extra storage it offers, knowing you built it yourself.