Ever thought about having fresh, nutritious sprouts right at home? Growing bean sprouts is easy and rewarding. This guide will show you how to turn simple beans into healthy sprouts in just days.
Sprouting beans is great for boosting your nutrition, perfect for plant-based eaters. With basic supplies and patience, you can grow bean sprouts in your kitchen. It’s ideal for those in apartments or anyone wanting fresh, homegrown food all year.
This guide is for everyone, whether you’re new to gardening or experienced. You’ll learn how to pick the right beans and harvest your sprouts. Discover how simple and cost-effective it is to grow your own greens. Ready to start sprouting? Let’s begin!

Key Takeaways
- Bean sprouts can be grown at home with minimal equipment
- Mung beans are ideal for beginners, sprouting in just 3-4 days
- Homegrown sprouts are more nutritious than store-bought options
- Regular rinsing and draining are key for successful sprouting
- Sprouts can be stored in the fridge for up to a week
- Indoor growing provides consistent results year-round
- Sprouting increases the nutrient content of beans significantly
Understanding Bean Sprouts: A Nutritious Home Growing Project
Bean sprout cultivation is a rewarding and nutritious home growing project. Sprouting beans at home adds a fresh, nutrient-dense element to your meals. Let’s explore the world of bean sprouts and see why they’re great for home gardeners.
What Are Bean Sprouts
Bean sprouts are the young shoots that come from germinated beans. They’re crisp, tender, and full of nutrients. You can start sprouting beans at home with just a few simple tools and some patience.

Health Benefits and Nutritional Value
Sprouting makes beans more nutritious. It boosts vitamin content, antioxidants, and enzymes. Raw sprouts add extra vitamins and make proteins easier to digest. This process changes indigestible proteins into forms our bodies can use.
Different Types of Beans for Sprouting
Many bean varieties are good for sprouting. Mung beans are popular because they grow quickly – they’re ready in about four days. Other options include:
- Lentils
- Chickpeas
- Adzuki beans
- Pole beans
- Lima beans
You can even use dried beans from the grocery store for sprouting. Try different types to find your favorite!
| Bean Type | Sprouting Time | Sprout Length |
|---|---|---|
| Mung Beans | 4 days | Up to 3 inches |
| Lentils | 2-3 days | 1-2 inches |
| Chickpeas | 2-3 days | 1-2 inches |
Remember, proper storage is key. After the fourth day, refrigerate your sprouts and eat them within a week. With these tips, you’ll be on your way to successful bean sprout cultivation at home!
Essential Equipment and Materials for Sprouting
Growing bean sprouts indoors is a fun and healthy way to add fresh greens to your meals. To begin your bean sprout farming, you’ll need some basic tools and materials.
Container Options for Growing
A wide-mouth mason jar is the most common choice for sprouting. These jars are great for growing bean sprouts indoors because they have plenty of room and make rinsing easy. If you’re on a budget, upcycled glass jars are a good alternative.

Required Tools and Supplies
For successful bean sprout farming, you’ll need:
- Window screen or cheesecloth for covering jar openings
- Rubber bands to secure the cover
- A dark cloth to cover the jar during germination
- A small weight for mung bean sprouts to achieve longer, straighter growth
Choosing Quality Seeds
Choosing high-quality seeds is key for healthy sprouts. Look for organic, non-irradiated seeds to avoid chemicals and GMOs. You can find these at health food stores or in the bulk sections of grocery stores.
| Seed Type | Ease of Sprouting | Raw Consumption |
|---|---|---|
| Alfalfa, Lentils, Chickpeas | Easy | Safe |
| Mung Beans, Adzuki Beans | Easy | Safe |
| Fava, Kidney, Black Beans | Difficult | Not Recommended |
Remember, safety is important when growing bean sprouts. Always rinse your sprouts well. Lightly cooking them can also help reduce the risk of foodborne illness.
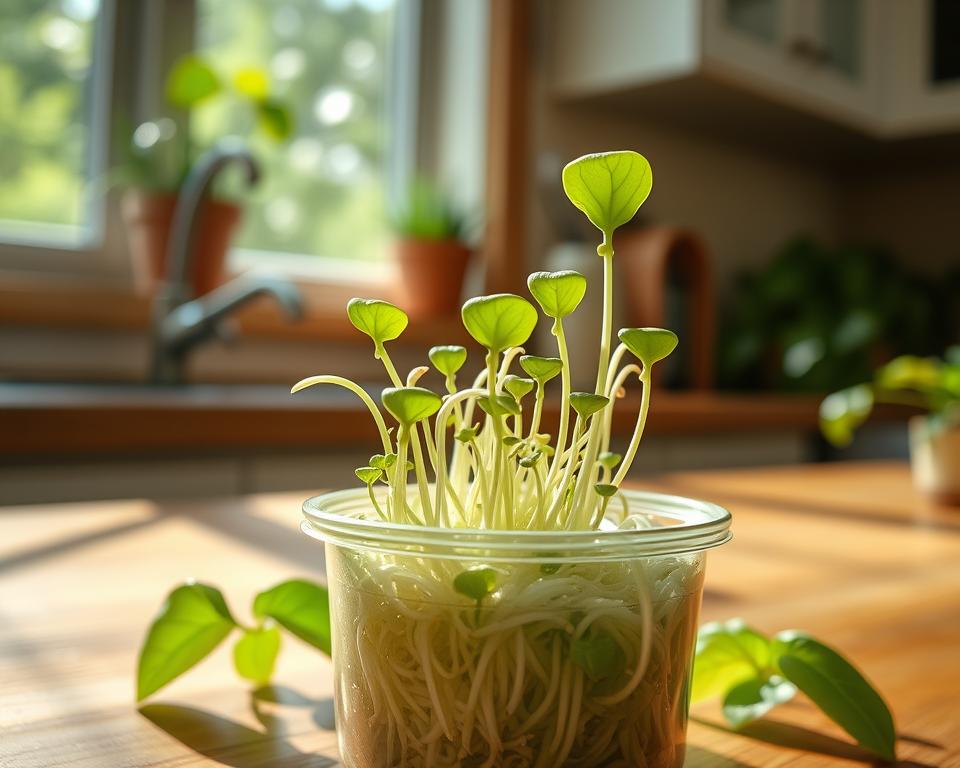
How to Grow Bean Sprouts: Step-by-Step Guide
Growing bean sprouts at home is easy and rewarding. You can have fresh sprouts in less than a week. This guide is perfect for both beginners and experienced gardeners.
Begin by soaking your beans in water overnight. Mung beans are good for beginners because they germinate quickly. After soaking, drain and rinse the beans well. Place the jar upside down in a bowl to drain excess water and ensure air circulation.
Rinse and drain your sprouts twice a day for 4-6 days. For mung beans, use a weight to help them grow straight. Your sprouts are ready when the white shoots are at least 1.5 cm long.
You can choose to expose your sprouts to light for green tips or keep them dark for white sprouts. Harvest them when they’re about 3 inches long, usually for mung beans.
“Sprouting transforms starch in legumes into a more nutrient-rich food, increasing folate, iron, vitamin C, zinc, magnesium, and protein content.”
| Bean Type | Sprouting Time | Best Use |
|---|---|---|
| Mung Beans | 12 hours – 3 days | Salads, Stir-fries |
| Lentils | 2-3 days | Sandwiches, Wraps |
| Chickpeas | 2-3 days | Soups, Hummus |
Remember, rinsing and draining well is important to avoid mold. With these steps, you’ll enjoy fresh, homegrown bean sprouts soon. They’ll add nutrition to your meals all year.

The Perfect Growing Environment for Bean Sprouts
To grow great diy bean sprouts, you need the right conditions. This guide will show you how to sprout at home. With the right setup, you can have fresh sprouts in just 3-4 days.
Temperature Requirements
Bean sprouts grow best at room temperature, between 68-72°F (20-22°C). This is ideal for growing indoors. Make sure your sprouting containers are away from heat and cold drafts for consistent temperatures.
Light Conditions
Bean sprouts don’t need direct sunlight. They actually do better in darker places. This is because they grow naturally under the soil. For green tips, give them indirect light on the last day of sprouting.
Humidity Control
Keeping the right humidity is key for healthy sprouts. Rinse and drain them at least twice a day for 4 days. This keeps them moist without mold. Also, make sure they have good air circulation by not sealing containers too tightly.
By following these tips, you’ll create the best environment for your bean sprouts. Growing your own sprouts can save money. A pound of organic mung beans costs about $9.36 and can make many batches of sprouts. Like growing carrots, your sprouts can last a week in the fridge, adding crunch to your meals.
Proper Rinsing and Drainage Techniques
Rinsing and draining are key steps in growing bean sprouts. Rinse your sprouts twice a day with cool, clean water. In the first days, use gentle water to avoid disturbing the seeds.
After rinsing, make sure to drain the sprouts well. This prevents waterlogging and mold growth.
When sprouting beans, proper drainage is essential. If using a jar, place it upside down in a bowl after rinsing. This helps water drain out. For containers, ensure drainage holes are clear. You can use a paper towel at the bottom to catch extra moisture.
Here’s a quick guide for rinsing and draining your sprouts:
- Rinse sprouts twice daily with cool water
- Use gentle water pressure initially
- Ensure thorough drainage after each rinse
- Invert jars at an angle for proper drainage
- Check container drainage holes regularly
Different seeds have different needs. Larger seeds like mung beans can handle a missed rinse day. But smaller seeds need more care. Good drainage keeps seeds from getting mushy or smelly, leading to successful sprouting.
Learning these techniques is vital for growing healthy sprouts at home. With the right care, you’ll have fresh, nutritious sprouts in just a few days. Mung beans, for example, can be ready in 48 hours in warm weather, making them great for beginners.
Common Growing Challenges and Solutions
Growing bean sprouts indoors can be rewarding, but it’s not without its challenges. Let’s explore some common issues in bean sprout cultivation and how to overcome them.
Preventing Mold Growth
Mold is a frequent problem in bean sprout cultivation. To prevent it, ensure proper drainage and air circulation. Rinse your sprouts at least twice daily with cool water. This helps keep them fresh and mold-free. If you notice any musty smell, it’s a sign to increase your rinsing frequency.
Managing Sprout Length
For even growth, maintain consistent moisture and temperature. If you’re growing mung bean sprouts, try using a weight system. This encourages thicker, crunchier sprouts. Remember, most seeds start sprouting within a few days to a week.
Troubleshooting Growth Issues
If your sprouts are thin or yellowing, they may need more frequent rinsing or better drainage. Avoid overcrowding seeds in the container. A good rule of thumb is to use 15ml of seeds per 500ml of space for sprouting. This prevents poor air circulation and reduces the risk of mold.
“Keep sprouts in cool conditions below 30°C to avoid bitterness in taste.”
By addressing these common challenges, you’ll be well on your way to successful bean sprout cultivation at home. Remember, patience and attention to detail are key in growing healthy, delicious bean sprouts indoors.
Harvesting and Storing Your Bean Sprouts
Growing bean sprouts at home is rewarding. Knowing when to pick and how to store them is key. This way, you can enjoy fresh, crunchy sprouts. Let’s look at the best ways to harvest and keep your sprouts.
When to Harvest
Harvest your bean sprouts when they’re the right length, usually after 4-6 days. Mung beans, a favorite for sprouting, are ready when they’re 2 to 3 inches long. This is often around the 5th day.
By the 6th day, you can harvest about 5 pounds of sprouts from 1½ cups of dried mung beans.
Proper Storage Methods
After picking, rinse your bean sprouts well. Store them in a clean container in the fridge. Add a dry cloth or paper towel to soak up extra moisture. This keeps them fresh and prevents spoilage.
For the best taste and safety, eat them within 3-4 days. Always check your sprouts before eating and throw away any that look or smell bad.
| Storage Method | Shelf Life | Care Instructions |
|---|---|---|
| Refrigerator | Up to 7 days | Rinse daily, keep in container with absorbent material |
| Room Temperature | 1-2 days | Not recommended for long-term storage |
| Frozen | Up to 3 months | Blanch before freezing, use in cooked dishes |
By following these tips, your homegrown bean sprouts will stay fresh and tasty. Growing your own sprouts can save money, with a small carton costing about $4 at some gourmet stores.
Safety Considerations and Best Practices
Bean sprout gardening is rewarding but safety first. While diy bean sprouts are mostly safe, there are key things to remember.
- Use clean water and equipment
- Rinse sprouts thoroughly every 12 hours
- Avoid standing water in your growing container
- Be extra cautious during warm, humid periods
- Store seeds in a dry place
- Consume sprouts within 5-7 days of harvesting
Homegrown sprouts are safe and nutritious if done right. But, commercial sprouts can cause foodborne illnesses. This risk is much lower with diy bean sprouts.
| Group | Recommendation |
|---|---|
| Healthy adults | Can enjoy raw sprouts |
| Children, elderly, pregnant women, immunocompromised | Should cook sprouts thoroughly |
If you see mold or slime on your sprouts, throw them away. Sanitize your container. Follow these tips to enjoy bean sprout gardening safely.
Creative Ways to Use Home-Grown Bean Sprouts
Now that you know how to grow bean sprouts, it’s time to enjoy them. Growing beans at home opens up many culinary possibilities. Let’s explore some exciting ways to add these nutritious gems to your meals.
Cooking Applications
Bean sprouts are great in cooked dishes. Stir-fries are a classic choice, with mung bean sprouts pairing well with meat, noodles, and veggies. Here’s a simple recipe to try:
- Heat oil in a wok over high heat
- Add minced garlic, fresh red chili, and scallions
- Toss in your homegrown mung bean sprouts
- Season with light soy sauce, Chinese black rice vinegar, salt, and a pinch of sugar
- Stir-fry for 2-3 minutes to retain crispiness
Raw Preparation Ideas
For a fresh crunch, use your sprouts raw. Add them to salads, sandwiches, or wraps. They’re great in veggie wraps for a crisp texture and mild flavor. You can also blend them into smoothies for extra nutrition.
Recipe Suggestions
Get creative with your sprouts! Try making sprouted chickpea hummus for a nutritious twist on the classic dip. Or add mung bean sprouts to Asian-inspired soups like pho for an authentic touch. Remember, a 50g batch of sprouted mung beans yields about 2 servings, each containing around 112 kcal and packed with fiber, protein, and essential vitamins.
“Sprouts are like little powerhouses of nutrition. They’re low in calories but high in nutrients, making them a perfect addition to any meal.”
Whether cooked or raw, your homegrown bean sprouts will add freshness, nutrition, and flavor to your dishes. Experiment with different varieties and find your favorite ways to enjoy these versatile and healthy additions to your meals.
Conclusion
Learning to grow bean sprouts at home is rewarding. These tiny foods are full of nutrients, making them a “superfood”. They have enzymes, antioxidants, protein, vitamins, and minerals.
By growing your own sprouts, you get fresh food. You also get a “living” food that helps with digestion and boosts immunity.
Bean sprout cultivation is easy and fun. Mung beans, for example, can make about 1 1/2 cups of sprouts from just a pound of seeds. With the right care, like rinsing and draining every 8-12 hours, you can have sprouts in 2-5 days.
The growth can be impressive. You can get 2:1 for short sprouts or 3.5:1 for longer ones.
Storing sprouts right is important to keep them fresh. Your sprouts can stay crisp for 2-3 days in an airtight container in the fridge. This journey might inspire you to grow other plants from seeds.
With patience and care, you’ll enjoy the fruits of your labor. You’ll add nutritious and delicious food to your meals. Plus, you’ll reduce packaging waste and practice sustainable food.
Check out growing other plants from seeds to expand your gardening skills.